2016年5月30日 星期一

Original tutorials and reflection

Original tutorials and reflection

This PDF included two tutorials.

Link: https://drive.google.com/file/d/0B_UIfUZbSMtIeU12VGNmT2RrbXc/view?usp=sharing

2016年5月16日 星期一

3D aluminium skin for PVC glue

Aluminium skin for PVC glue 


The aluminium skin doing this time would be the PVC glue from student that is studying Architecture in ratio 2:1. 


First of all, the aluminium sheet would be cut into appropriate size according to the wood template with the cutting machine shown on left. (Do not remove the blue coloured protector at this point) 


Remove the protector and you will get a smooth surfaced aluminium sheet.


Use the Marker to draw across the wood template on the aluminium sheet. (1~2cm thicker than the wood template)  


Use this blue cutter to cut the sheet that has been marked roughly first. (It is easier to use this machine than the hand cutter)


Next step is to use this hand cutter to cut the sheet more precisely. **Red coloured hand cutter is for right-handed user and green coloured hand cutter is for left-handed user.**


Use the rasp to rub the sharp corner in order to create better shaped aluminium skin.


The next step is to use this machine to curve the aluminium sheet a bit because the template provided has curve shape for the outlook.


Then, use hammer to tap the edges of the aluminium sheet because we are wrapping the aluminium sheet of half of the wood template. At this point, the aluminium sheet is still needed to be adjust. Use the marker to mark the unwanted part and cut it.


The head of the PVC glue is a bit inward than the body of the glue. Therefore, mark the surface that curved inward. Then, use the hammer to tap it carefully.


**The aluminium skin for the PVC glue is done!**

2016年4月27日 星期三

Aluminium Skin Finish

Aluminium Skin Finish


Blue cutter machine


After the previous two approaches, i found out that it is better to do the half shape of the template rather than doing the whole part of the body due to restrictions like the tool and model size.

Therefore, the third time approach began. This time, i will just do the left half part of the model. Firstly, draw the dog on the sheet (draw 4cm thicker than the original dog size) and then cut the aluminium sheet into appropriate size. Then, use the blue cutter to cut the sheet roughly. 


Hand cutter


Next, use the hand cutter to cut the corner precisely and use the rasp to polish the edge of the sheet in order to make the edge smoother. 
Rasp


Contour lines to indicate the areas

Next step is to remove the blue coloured protector and start to tap the dog inwardly curved a bit. Circle and draw the area with contour lines that need to be concave and use the hammers to tap it. With different purpose of tapping, various hammers and metal tool need to chosen carefully.

For example, the pictures below to show different types of hammer, the left one shows that the hammer that suits for smaller area and which could cause deeper mark. The yellow one in the middle shows that the hammer could make flat mark and suits for smaller area. 


Different types of hammer


Body curve
Whole body looking
Head mark


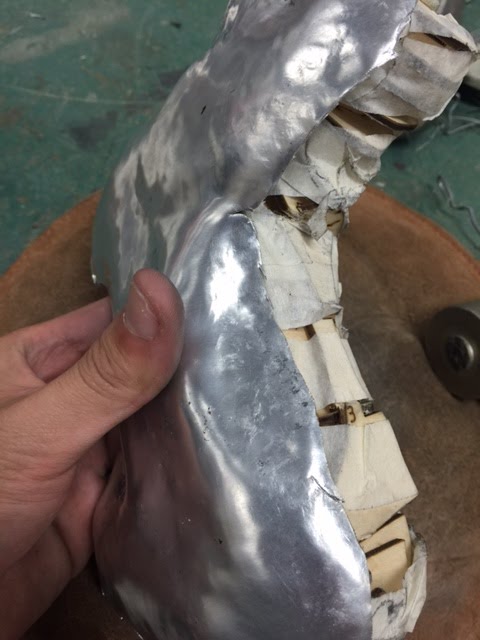
The next step is to tap the area that have been circled according to the 3D template. The middle part of the body and the area that between the neck and mouth needed to be concave according to the curve of the 3D template. Therefore, the pictures above showed the process of that.


Aluminium Skin
look from bottom
Aluminium Skin
look from side
Final product 


Lastly, the edges of aluminium sheet needed to be tapped much more inwardly curved if it is too long. Finally, after several times of experiments, the aluminium skin of the dog decoration is done! 

(Tips: Carefully to choose the machines and tools, they might save you a lot of time.)


Aluminium Skin Experiments

Aluminium Skin Experiments


The 1st experiment T-shaped aluminium sheet


After doing the 3D template, the aluminium skin is about to begin. 
Firstly, cut the aluminium sheet into correct size according to the 3D template which have been done. The material i use is the aluminium sheet in 3mm. The first approach is cutting the sheet into T-size, and marking the different parts of body. For the first approach, i am only doing the back part of the object which including the body, legs and butt. However, after the experiments, i found out the T-size is not working because the sharp corners would mostly likely break the sheet while bending it.


Second experiment showing
the rounded back part
Rounded shape tool


Curved shape tool 
Therefore, the second approach i do is to remove the sharp corners and cut it into rounded-shape for the back part instead. Then, by drawing the contour lines, it is easier to figure out which part should be tapping more and concave more. With the use of different heads of hammers and different metal tools, the body shape had been hit out.


Finishing of the body part 
The raised butt part


The last step of the second approach after tapping the body shape out is trying to pull the back part of aluminium sheet down and i tried to create the raised butt out. This time, with the change of the rounded back part, the sheet did not break or cracked. The folding of the back part has been successful and after that, use the hammer to tap inside the skin instead of outside the skin in order to create the raised butt. However, this aluminium skin is not match with the 3D template perfectly due to some problems. The problems have been found out during these two experiments which are the 3D template is too small and the tools provided in the workshop are too big, another reason is that doing the full part of the body is really difficult because the 3D template are too complicated and much shapes need to be created.


2016年4月25日 星期一

Laser cutting & 3D template

Laser cutting and 3D template


The laser cutting process is purposed to construct the 3D template for the aluminium skin. 


The material been used is the 3mm timber board, the gap is 3.2mm which allowed the pieces could join together. The wood pieces made out of 123D make has words on it to tell you which piece it is. 


The Z axis which refer to the portrait, and Y axis refers to the horizontal. The smaller the number, the lower location it is. After figuring the numbers out, I have joined all the wood pieces together and the model had been made.


123D Make

123D Make


The 123D Make software is to transfer the 3D object into 3D template. 

Firstly, the manufacturing setting needs to adjust to the material size which later need to be cut on. Next, the object size need to be set to appropriate level as easier for the construction of aluminium skin.

The most important part is to choose the suitable construction technique, in this case, i have chosen "curve" as my construction technique. For the "interlocked slices", there are a lot of error appear on the object however curve had no problem.

Lastly, by selecting the "get plans" button, the object had been cut to several parts and i saved that as PDF files for the next step - laser cutting.

Meshmixer

Meshmixer


As mentioned in last blog, the object has some holes on it due to the technique problems.

Therefore, this software Meshmixer is using to solve this problem. Firstly, i have removed all the irrelevant parts around like the background floor. 

Next, is fill up all the holes by selecting the area of the hole, and then edit and choose "erase and fill". Therefore, the 3D object can now be transform to the 3D template.